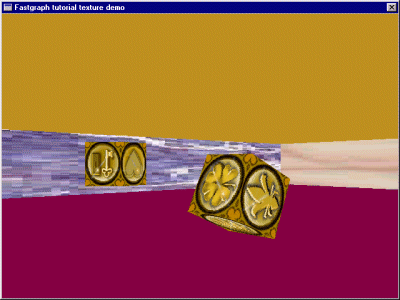
 Figure 4.1 Textures.
|
A Texture Example
As promised, here is another example. This one is more complicated than the
one presented in Chapter 2, so I am not going to post all the source code
here. You can download the source code
here. This is a C++ program. See figure 4.1 for a screen shot.
|
|
Figure 4.1 Textures.
|
|
I tried to keep this example simple while still putting in enough features to make it interesting. The program presents a room, consisting of four walls, each of which has a texture assigned to it. Within the room are three cubes. Each cube rotates around its own x, y, or z axis. You can move around the room to look at the walls and cubes from different angles. This program presents the bare minimum of the elements that make up a FPS (first person shooter). It has walls, it has objects, and it has interactivity. It is not a game, but if you are interested in writing an FPS game feel free to study this demo and expand upon the code. There are two data files associated with this program. One of them is game.ini which is an ini file. It is a simple ascii text file that you can edit in any text editor. It looks like this: The other file is called game.tmf. This is the file containing the textures. It is a binary file, but it also has a very simple format. It just contains the width, height, and reference number of each texture, followed by the texture data, which is a bitmap. See the source code for help reading this file, or devise your own file format. Both the game.ini and the game.tmf files were created using Fred, which is a primitive level editor I wrote. You are welcome to use and modify Fred if you like. Most game developers prefer to write their own customized world builder tools. Fred is provided as an example of how to use Fastgraph to write such a tool. Fred is not really a product itself. That is, we don't sell it or support it, and I will only work on it if I feel like it. It is an interesting program, though. The texture demo does not have floors or ceilings. There is no trick to floors or ceilings, you would define them the same way you define walls. Some people like to have tiled floors and ceilings. That is your preference. As always, the Fastgraph philosophy is to leave decisions like that to the game developer, who we are convinced are much better at designing such things than we are. Fastgraph's functions are low-level, general purpose, and flexible, and we will get back to describing them now.
|
Defining Texture Maps
There are four Fastgraph functions you need to know about in order to define
texture maps.
Applying the texture to the surface is simple. You use functions analogous to those you used to draw solid color polygons. First, though, you need to set the rendering mode. Call the fg_3Drenderstate() function like this: |
Textures Don't Have To Be Square
We try to keep this stuff as simple as possible, but sometimes reality dictates
another level of complexity. The reality of texture maps is, they sometimes have
to be z clipped. And sometimes you want to break up texture maps into parts, for
example if you have narrow adjacent walls and you want your texture map to span
both of them. Therefore, you need to pass an array to fg_3Dtexturemap() and
fg_3Dtexturemapobject() that contains the vertices of the texture map in
clockwise order. For example, if you are using a square 64 x 64 bitmap as in
Figure 4.2, the vertices array may look like this:
|
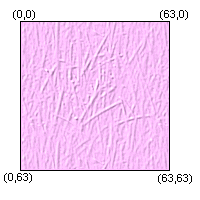 Figure 4.2 Texture Map Vertices.
|
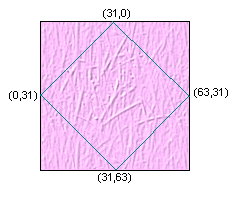 Figure 4.3 Diamond Shaped Texture Map
|
You can also use a diamond shaped texture map, as in Figure 4.3, in which case the
vertices array would look like this:
|
Applying The Texture
This is easy. To apply a texture to a polygon defined in world space, call this
function:
|
More About Color Depth
As I mentioned before, texture map data is a simple bitmap. Bitmaps, as you know,
are defined differently in different color depths. In a 256 color VGA mode, bitmaps
are defined to be one byte per pixel. In a 16-bit video mode (high color), bitmaps
are 2 bytes per pixel. In a 24-bit or 32-bit video mode (true color), bitmaps are
3 or 4 bytes per pixel. How does Fastgraph know the color depth of the texture bitmap? It
relies upon the color depth of the virtual buffers. When you call fg_vbdepth()
to establish the color depth of the virtual buffers, you are also establishing the
color depth of the textures.
The color depth of the virtual buffers and the texture maps does not have
to match the color depth of the display mode. You can define high-color virtual
buffers even when your program is running in 256 colors. It will work fine. Fastgraph
will do on-the-fly color reduction. This will slow down your program, and you may lose
some visual appeal, but the program will work. Similarly, you can define 256 color
virtual buffers in a program that is running in high color or true color. For fastest
results, make the color depth of the virtual buffers match the color depth of the
display. You can auto-detect this with fg_colors(). See the Fastgraph manual
for more details.
To capture a bitmap from a virtual buffer to use as a texture, you can use
fg_getimage() in a 256 color mode, or fg_getdcb() to get a
direct color bitmap in a high color or true color mode.
|
Putting It All Together
Here is how I used the functions above to create the program shown in
Figure 4.1. First, I declare my texture class like this:
The memory for the texture map is allocated in the constructor and
freed in the destructor. That's important! Don't forget to allocate and
free your texture map memory. (See the source code for an example of
how to use GlobalAlloc() and GlobalLock() to allocate
well-behaved blocks of memory).
The cubes in my program are made up of faces. I declare my face class like this:
Notice the Face pointer is a pointer to an array of faces, not just one face. Hence
the double pointer.
So, the Item points to the Face and the Face points to the
Texture. After everything has been read from the file and initialized, I
display a textured face of a cube like this:
|
Review
Textures make your 3D objects look more interesting. Textures need to be
defined, selected, and applied. Textures can be
various shapes and sizes, but the color depth of the texture must match
the color depth of the virtual buffers. You can read texture data from
a file, or you can grab it as a bitmap from a virtual buffer. Texture
information is stored in a texture map table in order to be
compatible with Direct 3D.
If you have gotten this far in the tutorial, congratulations! You now understand
all the basic elements of a 3D program, and you are well on the way to writing
3D games of your own. If you haven't started writing code yet, this would be
a good time to dive in and do some compiles.
In the next chapter we will talk about how to take advantage of the features of Direct3D.
|
Introduction
Chapter 1 |
Chapter 2 |
Chapter 3
Chapter 4 |
Chapter 5 |
Chapter 6 |
Chapter 7
Appendix 1 |
Appendix 2 |
Appendix 3
Benchmarks
Fastgraph Home Page
