Gamma Correction
A few months ago, I submitted a program to the flipcode contest. I didn't win the contest, but I thought my entry was kind of interesting. The subject was electricity, and I wrote a program about lightning.
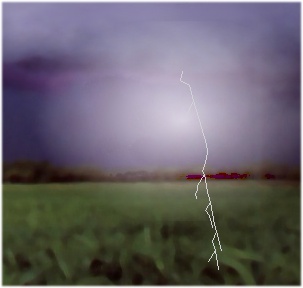
You can download the storm program here. This program had two challenges for me: first, making the lightning fork. I used a recursive tree algorithm for that. Second, making the sky and the ground light up as the lightning flashed. For this, I used Fastgraph's gamma correction functions. Making the sky light up required an oval-shaped mask called an "opacity bitmap". Here is how I built the bitmap: This is may be more intuitive if you look at the picture above. You can see the light is most intense at the center of the oval, and less intense around the edges. To achieve the desired effect, we grab the background in a direct color bitmap (dcb), then modify every pixel using a gamma correction factor. This is the "foreground". It is uniformly modified. If we wish to lighten it, then every pixel in the foreground is lightened by the same amount. We apply the foreground to the background using the opacity bitmap to blend them together. Where the opacity bitmap is most intense, the foreground pixels will show. Where the opacity bitmap is least intense, the background pixels will show. In between, the foreground and the background pixels will each contribute to the final image. But there is another factor involved. Lightning doesn't just flash on and off. It increases and decreases incrementally. So we need to adjust the level of the glow over the course of several frames. We do this by adjusting the gamma value that is applied to the foreground. Here is the code:
First, we grab an area of the virtual buffer with fg_getdcb(). This puts creates the foreground image in a dcb. Then we apply the gamma correction to it using fg_gammadcb(). This will either brighten or darken the bitmap, depending upon the value of gammaValue. Finally, we blend the dcb back into the virtual buffer using fg_blendvbv(). The blending happens according to the values in the opacity bitmap. So an oval pattern occurs. This is key: The dcb is uniformly modified with fg_gammadcb(). It is only when it is blended back into the virtual buffer that you get the oval pattern based on the opacity bitmap. This is an extremely useful technique. You can create all kinds of special effects with this. The opacity bitmap does not need to define an oval, it can be any shape, with pixels of any intensity. Possible uses in a game might be a spotlight shining on a wall, explosions from gunfire, the glow of a cigarrette, or highlighting areas of a map. Besides gamma correction, which adjusts the brightness of an image, there are some other Fastgraph functions to modify the appearance of an image, as follows: Alpha BlendingAlpha blending is the process of combining two colors to create a third color. When applied to every pixel in an image, the result is a merged image. When applied in a sequence, you can get a nice fade or morph. Fastgraph has several ways of achieving alpha blending. You can alpha blend a single color, you can blend two dcb's, or you can alpha blend a dcb into a virtual buffer. When you blend images, you can do it consistsently throughout the entire image, or you can use varying intensities for the foreground image, as we did above with gamma correction. The result might be, for example, a woman with the facial features of a cat. The alpha blending functions are fg_blend(), fg_blend50(), fg_blenddcb(), fg_blendvar(), fg_blendvb() and fg_blendvbv(). For more information and examples, see the Fastgraph manual or help file.
Contrast EnhancementFastgraph provides several functions for contrast enhancement. You can enhance a dcb with fg_contdcb(), enhance a virtual buffer with fg_contvb(), or enhance a series of RGB triples with fg_contrgb(). The general idea is, you adjust the color components of each pixel by choosing a range of values (for example 100 to 200). All the color components above 200 are set to 255, and all those below 100 are set to 0, and the color components in between are adjusted on a linear scale. The result is brighter brights and darker darks. By experimenting with this, you may be able to see, for example, UFO's in a photograph that otherwise appears to contain only sky and clouds. It happens all the time on the Discovery Channel.
Gray ScaleThe fg_graydcb() function converts a color image to its grayscale equivalent. It bases the conversion on the luminence of each pixel value. The result is a picture with no color in it, just shades of gray. You can also use the fg_grayvb() function to grayscale a rectangular area of a virtual buffer, or fg_grayrgb() to grayscale a series of RGB triples.
Photo-InversionThe fg_photodcb(), fg_photovb() and fg_photorgb() functions replace each RGB color component in an image with its grayscale opposite. It creates a "negative" effect, like looking at a film negative. I'm not sure what this is useful for, but it's in Fastgraph now, so somebody better find a way to use it.
ConclusionThere are many image processing functions. See the Fastgraph manual or Appendix 2 for a list. I have not fully explored all the effects that can be achieved with these functions. I would like to see some more interesting demos like the one above. If you write any cool demos using the Fastgraph image processing functions, please email me. |
